Finishing off our kitchen

We moved into our house just over six months ago now and at the time we promised ourselves that we would finish off the kitchen within that first week after doing most of it as a rushed DIY job the week before we moved in. Fast forward six months and no prizes for guessing that nothing had been ticked off the to do list including tiling the splash back, which by this point was getting more and more unpleasant as it gets splattered by food cooking on the stove, coffee from the machine, water from the sink and the chopping boards leaning against it have scuffed it badly. Therefore, when Maitland & Poate got in touch about showcasing their antique tiles sourced from Spain in our kitchen it was just the push we needed to finally finish off the job.

I found it very difficult to choose which tile to use as the family team behind Maitland & Poate source such beautiful genuine antique cement tiles and each design is so different. My first choice was actually this design but Jules vetoed me on it as he didn’t like the colours so we compromised on the Ceniza tile. We chose this tile because the colours tone so well with the Light Blue on our wood work and the Railings that we painted our kitchen cupboards.

Jules and I decided to install the tiles ourselves to save money although it is advised to get a professional to install cement tiles as they are porous and need sealing. These particular tiles are also much thicker than average glazed tiles. However, we tiled our last kitchen so we already had a tile cutter and all the tools and because these tiles have already been sealed during their lifetime they are far more forgiving than brand new cement tiles that need to be treated with far more care so that they don’t absorb moisture and stains before being fully sealed.

Maitland & Poate also sell a range of new cement tiles and I was very tempted by these pink tiles. I’ve been asked a lot about what makes cement tiles different and I would say it is the matt texture, which makes them feel and look different. The main difference with the antique cement tiles is that they aren’t in ‘perfect’ condition. They have been reclaimed so there may be chips or slight staining, which all adds to their character.

We didn’t find it much more challenging installing the antique tiles than doing new glazed ones other than it’s a little tricker laying them flat as the back of them aren’t always flat having been chipped out of their original place. We followed Maitland & Poate’s recommendation and used Ecoprotec sealant and that seems to have worked well.

The only thing we still need to do is the sealant between the bottom of the tiles and the worktop. Let’s just hope it doesn’t take us another six months…!

Have you ever considered antique tiles? I think these would make for an amazing statement floor. What do you think?

Thank you so much to the wonderful Maitland & Poate team for collaborating with me on this project.

Katy x

Adding storage to my bedroom with an ottoman storage bed from Button & Sprung

Moving to a three bedroom house from a two bedroom flat has definitely given us more space but there is one room in our new house that is significantly smaller than in our previous flat and that is the master bedroom. In the long term we would like to convert our loft, which would make for a lovely sized master bedroom but for now we have to make the best of a small room.

I had planned to have a relatively low bed with legs as I think that style of bed makes a small room feel as spacious as possible especially as the light can travel under the bed. However, I soon came to realise that I would end up stuffing things under the bed as there is absolutely no built in storage and I HATE having a mass of dusty things under the bed. I started looking at divan beds with drawers but I think these can get annoying especially if you overfill them or there is a rug on the floor that rucks up every time they are opened. Also, on the window side of our bed there simply isn’t enough space to pull out a drawer and on the other side I would have to move the bedside table every time I wanted to open the drawer.

The lovely team at Button & Sprung got in touch with me at this point as they wanted to collaborate to showcase one of their beds in my new bedroom. I was hesitant at first as I just couldn’t figure out what type of bed to go for. I relayed the various problems I had to the team and they suggested their ottoman storage bed. Of course! It solved all of the problems I had: it stores a massive amount, it is all fully accessible and it is no bigger than a normal sized king size bed.

I went into the Button & Sprung showroom to have a look at the king size ottoman and try it out (being a bit unsure as to how the mechanism works and whether it’s more hassle than it’s worth). The staff were so lovely and patient as they answered all my questions and even chased Mimi around so I could concentrate on the beds.

The bed has a gas-lifting top that is very easy to lift and opens to reveal a huge space for storage.

The first thing the staff pointed out was that you need a mattress that weighs at least 35kg to keep the bed shut. I had one of those so that was all good. The next thing they showed me was how to lift up the top of bed and close it again. It takes very little effort to open the bed but it definitely takes effort to close it. However, I have got used to it very quickly and open the bed twice a day every day as we keep Otto’s dog bed in there during the day as there’s not enough floor space in the room to have it out.

Once the bed is open the entire base of the bed is available for storage and you would be AMAZED at how much you can fit in. We have so little built in storage or space for cupboards in our house so this amount of space is a god send. I actually used the space as a makeshift wardrobe for the first few weeks as we had nowhere else to put clothes.

The sides of the base are all beautifully upholstered so there are no nasty sharp edges to bash shins on and the edges also don’t protrude beyond the mattress so it takes up no more space than an average king size bed. This was very important to me as I wanted the bed to take up as little space as possible.

I was totally sold on the idea of the ottoman after my showroom visit and I also left with lots of fabric samples. Whilst I was there I also had to decide on the headboard style. Aesthetically I tend to prefer beds with no headboards but on a practical level it can just be a bit gross as the wall gets all grubby and your pillows end up down the gap between the bed and wall. Therefore, I wanted the most minimal headboard available and the Burdock style is just that: no frills, just a classic shape that won’t date.

I chose the Burdock king size ottoman bed as the headboard is the perfect simple shape for a small room.

The headboard is very comfortable and in terms of comfort you would never know the bed itself is anything other than a conventional bed; the ottoman base makes absolutely no difference to how sturdy it feels. You would never in a million years know that the base is hollow and this all lies beneath…

I chose the linen fabric for the upholstery as I wanted to keep it neutral in such a small room so it didn’t feel too dominant.

My bed is upholstered in Plain Viscose Linen fabric in the ‘Linen’ colour way.

It’s a lovely soft colour that works very well with my new wall colour…

I have recently repainted my bedroom in School House White from Farrow & Ball, which works much better with the natural linen colour of the upholstered bed.

I am so pleased that Button & Sprung introduced me to this style of bed as I had never considered it before. It is working for us so well on a practical level and I really admire the design as it doesn’t feel too big or heavy in such a small room even though it gives us a massive storage space akin to a huge cupboard.

Thank you to Button & Sprung for partnering with me on this post. I would definitely recommend you investigate an ottoman storage bed if you too are struggling with space/storage or if you just can’t help but shove endless stuff under your bed!

Katy x

*This post was written in collaboration with Button & Sprung.

Painting my uPVC front door

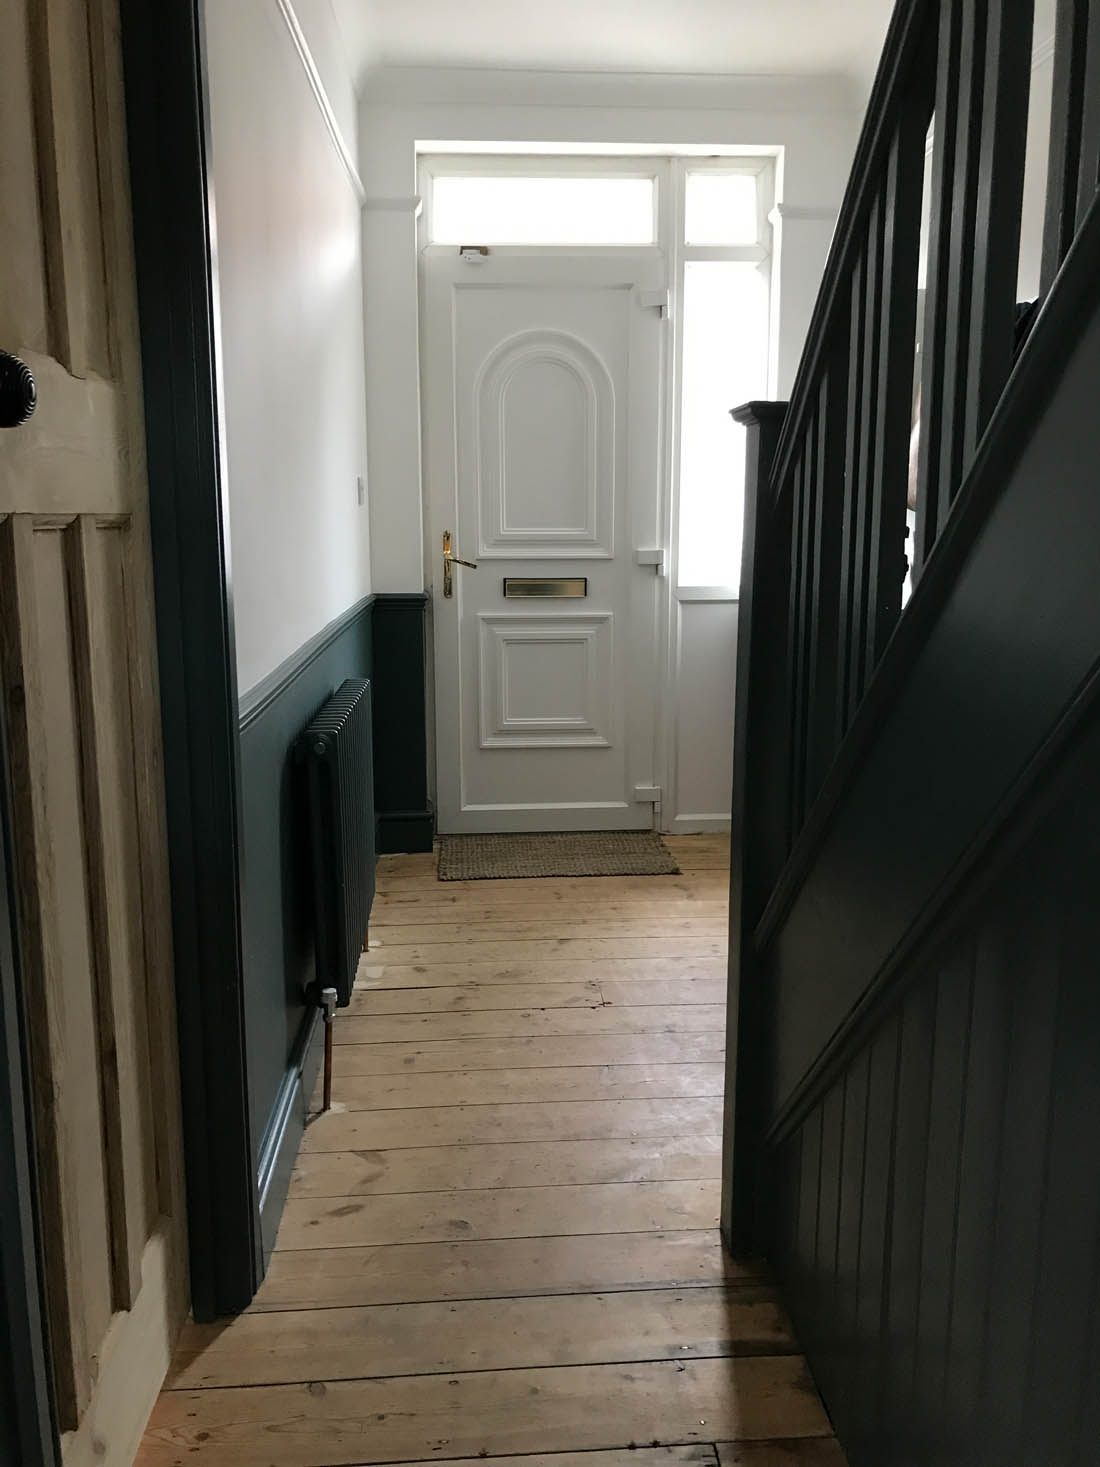
Happy new year everyone! I hope you all had a good break. I don’t know about anyone else but my fave part about the holidays is the time between Christmas and New Year as I get a chance to do DIY and organise stuff I’ve been ignoring the rest of the year. We took this opportunity to figure out a solution to a problem that’s been bugging me since we moved into the house which is our horrid UPVC front door. The door does not match the period style of our hallway so one day I would really love to change it back to an original 30s wooden front door. In the meantime, however, I have been desperate to find a way to improve the way it looks from the inside without spending much (absolutely no point in doing anything to the outside yet as that would be the very definition of polishing a turd! The brown pebble dash frontage and rotting fence have to be sorted first before anyone can even think about the front door). The door is a very cheap one with unpleasant mouldings and no glazing so it’s a big solid lump of white plastic and the sheen of uPVC is perhaps the thing I like least about it. We have uPVC back doors and windows throughout the house, which don’t bother me at all (in fact, I’ve grown to be very grateful for them as they are so effective) but the front door is such a large lump of the stuff that I just can’t bear it anymore. I just don’t want those faux period mouldings in my life!

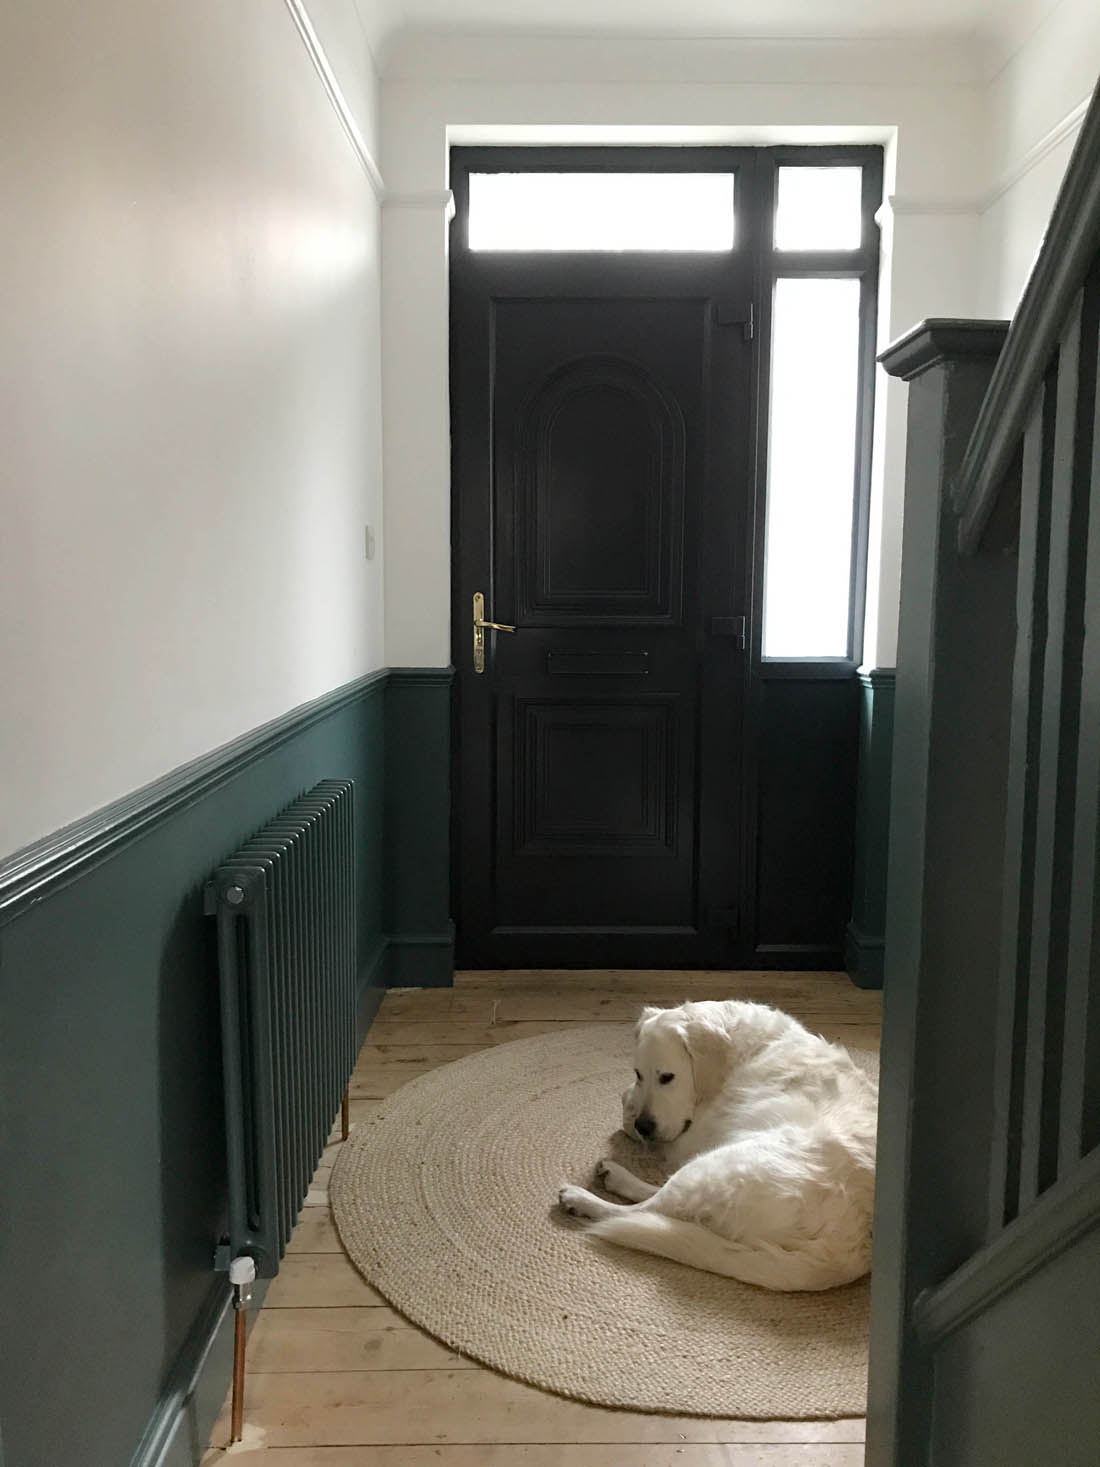
We talked about paneling over the door and other impractical solutions like that and the only sensible thing we could come up with was to paint over the door in a very dark colour that would make the mouldings disappear and remove the sheen of the uPVC. But you can’t paint over this type of surface…right? Wrong! We’ve done it. It’s a triumph and I could not be happier with the results. Ronseal had asked me to choose a product for a DIY project I was doing at home so I chose their One Coat All Surface Primer and Undercoat with the intention of transforming the inside of our front door and beginning the process of making our hallway feel and look better. It worked so well and we went over it with a very dark blue satin paint left over from our kitchen cabinets so we’ve made a big difference with very little cost.

Ronseal uPVC primer on front door

Let me chat you through how we did it and what it used to look like…

You can see more of what the hallway looks like in this post and whilst I am very happy with the paint colour, the introduction of a dado rail as well as dipping the original internal doors the front door just stood out like a sore thumb. Almost as bad as the uPVC was the gold plastic letterbox 😉 There was no point painting over the white plastic in any colour other than a very dark one – as the dark colour is what would help make the mouldings far less obvious – and I thought choosing the wall colour would be a bit overwhelming so I went with the same paint as we choose on our kitchen cabinets (you can see details of my kitchen here). However, a primer suitable for uPVC was essential to make sure the paint adhered to the shiny surface of the plastic.

Ronseal all surface primer

We prepped the door with Ronseal’s One Coat All Surface Primer and Undercoat after a light sand and clean. The primer was very easy to apply and it did only need one coat.

We also decided to prime and paint the gold plastic letterbox and we may replace the handle for a dark one too but we didn’t think it was worth painting it because of the wear it gets.

This is what the door looked like before we went to bed that night and we waited until the morning to do the second coat.

After the second coat the door looked like this and the shine of the satin paint could be seen making the door look more like a painted wooden one rather than a plastic one. We did end up with lots of brush strokes in the paint so it definitely wouldn’t be classed as a professional paint job but I really don’t mind as it makes it look and feel a bit less pristine, which is part of what makes it stick out like a sore thumb when contrasted with the old floorboards.

And here is the finished door…

As you can see, the mouldings are far less obvious in the dark colour and I think the colour works well with the period feel of the dado rail and wall colour. Being able to paint over the letterbox has also made a big difference, in my opinion.

I am delighted with the results and the texture of a painted door rather than a plastic door is such an improvement! I’m amazed how easily we were able to paint over the uPVC and it’s just the temporary fix I was looking for before we can afford to fit an original 30s door. I’ve now got my eye on a lovely big round mirror to go on the left hand wall and a ceramic wall light to soften the light in here as the spotlights are hellish. After that we need some prints and storage furniture but all in good time.

What do you think? Be honest!

Katy x

*This post was written as part of a paid collaboration with Ronseal.

Why choose a 1930s house and where to find inspiration to maximise its potential

I grew up in a large Victorian house and then we moved to a Georgian townhouse when I was a teenager so I feel very comfortable in period homes. In the past when I thought about what type of house I would like to buy I always had in my mind a Victorian terraced house. However, I am now a 1930s convert. Admittedly, I don’t think I would have ever looked at a 1930s house if budget had not been one of the main driving forces behind our house search so it feels like a happy accident that what we could afford is actually, in my opinion, going to be a better family home for us than a Victorian house would have been. Even in its full pebble dash glory 😉

So, what is it about a 1930s home that has converted me? And how did I figure out that I could make it work for us?

1. Purpose built

Compared to Victorian terraces, 1930s houses are purpose built for one family so the layout works really well. No downstairs bathrooms, no skinny hallways, no long narrow kitchen extensions that don’t make the most of the garden, no dark rooms with a lack of windows. The rooms are square and well proportioned and everything is where it should be.

2. Easy to extend

The shape and layout of a 1930s house make them ideal for extensions at the back of the house and into the loft. Coupled with the fact that during this era houses had bigger gardens than earlier houses, largely because they were built further away from the centre of towns and cities, creating the suburbs, means that extending won’t mean you end up with no garden.

3. Back of house opens up onto garden

My pet hate about certain houses is the fact that you can’t see or access the garden conveniently. I really dislike sitting in a room at the back of a house and having no sense that there is a garden. I think that if you can’t access your garden freely you won’t use your garden, especially if you have kids and can’t see what they are doing from the house. I am SO excited about the fact that our new house is completely open to the garden right across the back of the house. The idea of that makes me really happy and until we can afford to extend Jules is going to build a deck that goes straight out from the house, which effectively will give us more living space.

4. Knock down walls

It is very easy to remove walls in a 30s house to create open plan living, if that is your thing, as the layout is so square. This makes even the tiniest house suitable for a family as you can create space.

5. Period features

I really love that there are still period features in 30s house that make it feel like a Victorian terrace. Picture rails, architraves, doors, banisters, bay windows, fireplaces and tiled hearths all make it feel cosy and homely to me.

6. Garden size

As I have already mentioned the garden size of a 30s house compared to earlier houses is generally a lot bigger as they were built on the outskirts of towns and cities. This is always a welcome surprise in London. A lot of these houses are semi detached or detached with side access, which is also a benefit (especially for us with a very muddy dog so we can take him straight round to the garden instead of traipsing mud through the house and I’m thinking that when Mimi has a bike and stuff like that this will be useful too).

7. Good condition

Generally speaking because 1930s houses are younger they are in better condition than older houses and fewer unpleasant surprises are lurking under wallpaper and floorboards.

Realising the potential and finding inspiration

Now, obviously all of the points I have made here are generalisations as some older properties are completely wondrous and tick every box going and some 1930s houses are horrid but if you are house hunting it’s worth just having a think about these things. I was recently asked how I figured out that I could make a 1930s house into a home that would suit us and where I found inspiration for our plans for the house. Therefore, I have made a list of what I did to help convince myself that my pebble dash house could be a dream come true…

8. Play the Rightmove game

If you find a house of a period that you are not used to and want to explore what you can do to it to make it suit you and your family get on Rightmove and have a look at neighbouring houses. Select the ‘Nearby Sold Prices’ option and nose around the street to see whether you can extend, what the house looks like all done up, whether you can change the layout and so on. This is invaluable info. I also looked at the satellite images to get an idea of how many houses in the street had extended outwards and upwards.

9. Knock on doors

It takes a bit of guts but knock on neighbours’ doors if you want to see the potential of a house you are looking at. Alternatively, have a good nose through neighbours’ windows (I totally did this and got a good idea of how the space would look open plan).

10. Visit friends

If you have friends that live in a house of the period you are considering go and visit them and get a good feeling for the house and space. My bezza moved into a 1930s house just up the road from us about two months before we bought our house so it was a brilliant opportunity to figure out how the house would work.

11. Pinterest and Houzz

Do use the internet for inspiration and find houses that are similar to the one you are looking at as this can be an invaluable source of inspiration for decor. I found articles like this one helpful when I was looking.

Be open to different styles and types of houses if you are searching as you never know what may work for you.

Katy x

P.S. Let’s all be clear that our new house is about a tenth of the size of the houses above and won’t even have a proper kitchen to begin with 😉


Meet Mimi…

Lovely readers, I am so excited to introduce you to our precious little girl, Mimi Ada Copeland, born on 19th January.

Mimi’s birth feels like a magical blur that happened so long ago. In fact, it feels as though we have known her forever. But the reality is she arrived just three short weeks ago, and she was in quite a hurry, too. After just a few hours in the hospital out she came and our five year wait to meet her was over. I’ll never forget the moment I saw her beautiful little face for the first time and I haven’t stopped staring at it in wonder since.

The newborn bubble has been wonderful, terrifying and exhausting all at the same time – nothing quite prepares you for the realisation that you are responsible for keeping this tiny little baby happy and healthy. Mimi feeds non-stop and doesn’t sleep during the day so achieving anything at the moment is near impossible but I’m just going with it (this is the very first time she has settled herself to sleep during the day so I’ve grabbed a few minutes to write this). I’ve very quickly learnt that I need to place my phone, water bottle, snacks, TV remote on the correct side of me according to which boob she is on – this is an important lesson!

For now, I will be taking a short break from the blog and popping in as and when I can. We’ve waited a long time for this beautiful babe so I intend to make the most of this time as everyone keeps telling me it goes so fast; I already miss her being teeny tiny!

Thank you so much to everyone who has messaged me, left gorgeous comments on my Instagram or Facebook posts. I can not get over how kind and generous everyone has been. It is so amazing to be able to share the happiness we feel with you.

Katy and Mimi xxx